9 Reasons Why You’ll Love Easy Homemade Bread
Oh my goodness, you guys, get ready to fall in love! Making bread at home used to sound like some kind of wizardry to me. I mean, all those fancy techniques and ingredients? Forget about it! But I’m here to tell you, it’s totally possible to bake easy homemade bread for beginners, and it’s WAY easier than you think. Seriously, the smell of fresh bread baking in your kitchen? It’s pure magic! Plus, you know exactly what’s going into it, so you can skip all those weird preservatives and enjoy the real deal. Trust me, the first time I pulled a warm, crusty loaf out of the oven, I felt like a superhero. It’s so rewarding!
And the best part? This recipe is a breeze. It’s truly a beginner’s dream. Let’s get baking!
Ingredients You’ll Need for *Easy Homemade Bread for Beginners*
Okay, so here’s what you’ll need to make this super simple bread. Don’t worry, the list is short and sweet. You probably already have most of this stuff in your pantry!
- 3 cups all-purpose flour
- 1 teaspoon salt
- 1 packet active dry yeast
- 1 1/2 cups warm water
- 1 tablespoon olive oil
Essential Ingredients and Substitutions
Let’s break down these ingredients, shall we? I’ll tell you why we need ’em and maybe even a little trick or two.
3 cups all-purpose flour: This is our base, the foundation of our bread. All-purpose flour is perfect for beginners because it’s pretty forgiving. It creates a nice, tender crumb. Now, if you’re feeling adventurous, you can totally swap out some of the all-purpose for bread flour. Bread flour has more protein, which means chewier bread. Just be aware that you might need a little more water! And if you’re gluten-free? No sweat! You can use a gluten-free all-purpose flour blend. Just make sure it has xanthan gum in it for the best results.
1 teaspoon salt: Salt does a few important things. It adds flavor (duh!), but it also helps control the yeast and strengthens the gluten. Don’t skip it! Trust me, I once forgot the salt, and the bread tasted…well, bland. Use regular table salt or sea salt – whatever you have on hand.
1 packet active dry yeast: This is the magic ingredient! Yeast is what makes the bread rise. Active dry yeast is the most common type, and it’s super reliable. Make sure your packet isn’t expired! I always check the date. You *can* use instant yeast, too – you usually don’t need to proof it (which means dissolving it in water first). But for this recipe, stick with active dry, and you’ll be golden.
1 1/2 cups warm water: The water activates the yeast. It needs to be warm, but not *too* warm or it’ll kill the yeast. Aim for about 105-115°F (40-46°C). I usually test it with my finger – it should feel comfortably warm, not hot. I’ve ruined a batch or two by making the water too hot. Oops!
1 tablespoon olive oil: Olive oil adds flavor and helps create a soft, tender crumb. You can use other oils, like vegetable oil or avocado oil, if you prefer. But olive oil just gives it a little extra something, you know?
Step-by-Step Instructions: How to Make *Easy Homemade Bread for Beginners*
Alright, friends, let’s get our hands dirty (literally!). This is where the magic happens. Don’t be intimidated – I’ll walk you through every single step. Just follow along, and you’ll be smelling that amazing bread in no time!
Preparing the Dough: Mixing and Kneading
First things first, grab a big bowl. You’ll want one that gives the dough plenty of room to grow. In the bowl, dump in your flour and salt. Give them a little whisk with your fingers to mix them up. Then, sprinkle in that packet of yeast. Now for the water: add the warm water to the bowl. Stir it all together with a spoon or a sturdy spatula until a shaggy dough starts to form. It’ll look a little messy at first, but that’s okay!
Next comes the fun part: kneading! Turn the dough out onto a lightly floured surface. Now, here’s where you work those arm muscles! Knead the dough for about 5-7 minutes. You can use a stand mixer with a dough hook if you have one, but honestly, kneading by hand is so satisfying. To knead, push the dough away from you with the heel of your hand, fold it over, and give it a quarter turn. Repeat, repeat, repeat! The dough will start to become smoother and more elastic as you go. If it’s too sticky, add a little more flour, a tablespoon at a time. If it’s too dry, add a tiny bit more water.
How do you know when it’s ready? Well, it should be smooth, elastic, and slightly tacky, but not sticky. When you poke it gently, it should spring back a little. It’s like a workout for your bread! When you’re done kneading, add the olive oil, and knead for another minute or two to incorporate it. Trust me, it’s worth the effort!

First Rise: Allowing the Dough to Develop
Okay, now for the first rise! Lightly grease a clean bowl with a little olive oil. Place the dough in the bowl, turning it to coat all sides. Cover the bowl with plastic wrap or a clean kitchen towel. Now, find a nice, warm spot for it to hang out. A warm place is key for the yeast to do its thing – a slightly warm oven, or near a radiator will work. Let it rise for about an hour, or until it has doubled in size.
Don’t worry if it takes a little longer! Just keep an eye on it. How do you know if it’s ready? Gently poke the dough with your finger. If it leaves a small indentation and slowly springs back, it’s ready! If it springs back immediately, it needs more time. If it collapses completely, you might have let it rise a little too long. Don’t worry, it’ll still probably taste amazing. If you’re really worried about over-proofing, you can always put it in the fridge to slow things down.
Shaping and Baking Your *Easy Homemade Bread*
Alright, the moment of truth! Gently punch down the risen dough to release the air. Turn it out onto a lightly floured surface and shape it into a loaf. You can do a classic oblong shape or get creative. Just gently flatten the dough into a rectangle, then roll it up tightly, like a jelly roll. Pinch the seam to seal it.
Now, prepare your baking pan. You can use a loaf pan, a baking sheet, or even a Dutch oven. If you’re using a loaf pan, lightly grease it or line it with parchment paper for easy removal. Place the shaped loaf in the prepared pan, seam-side down. Cover it loosely with plastic wrap or a clean towel, and let it rise for a second time for about 30 minutes, while you preheat your oven to 375°F (190°C).
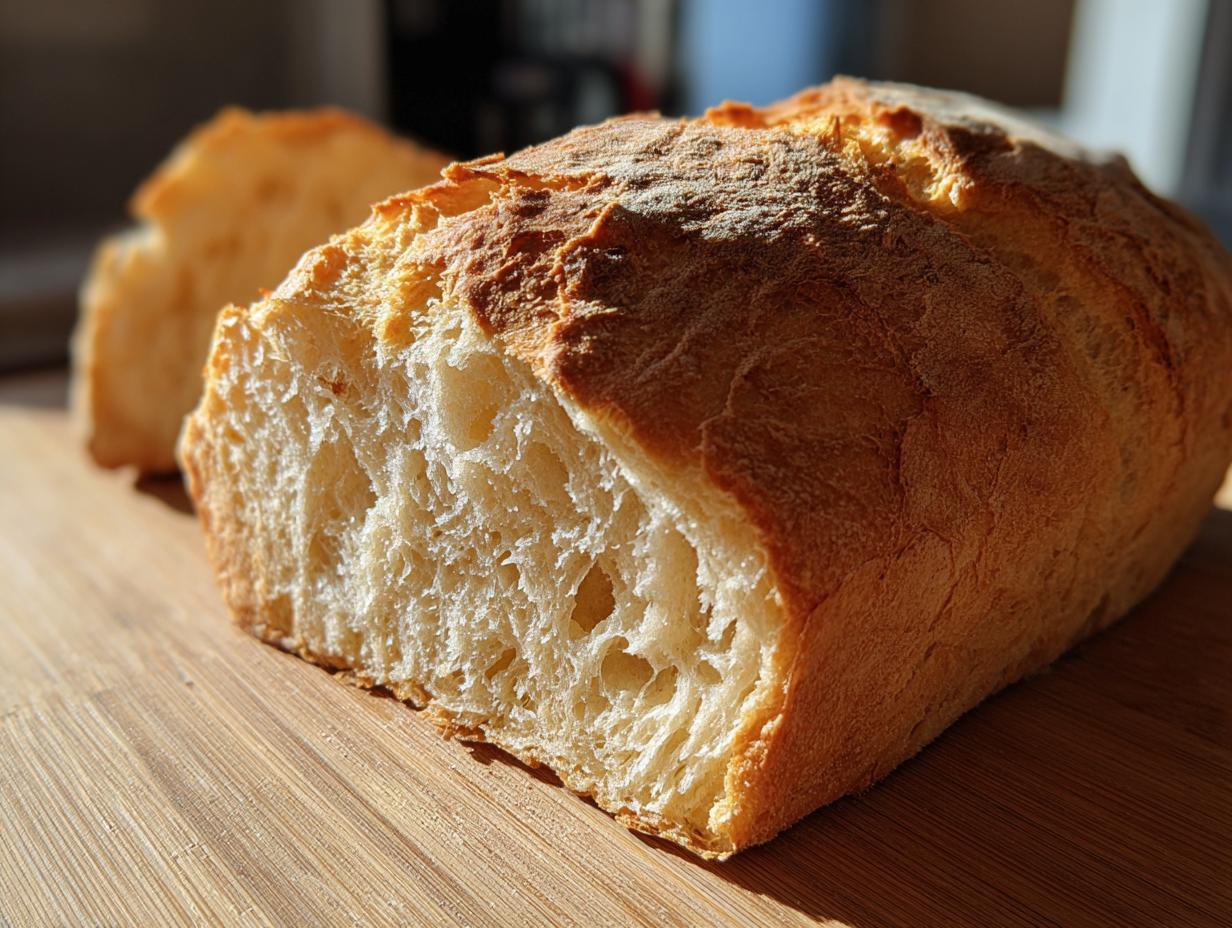
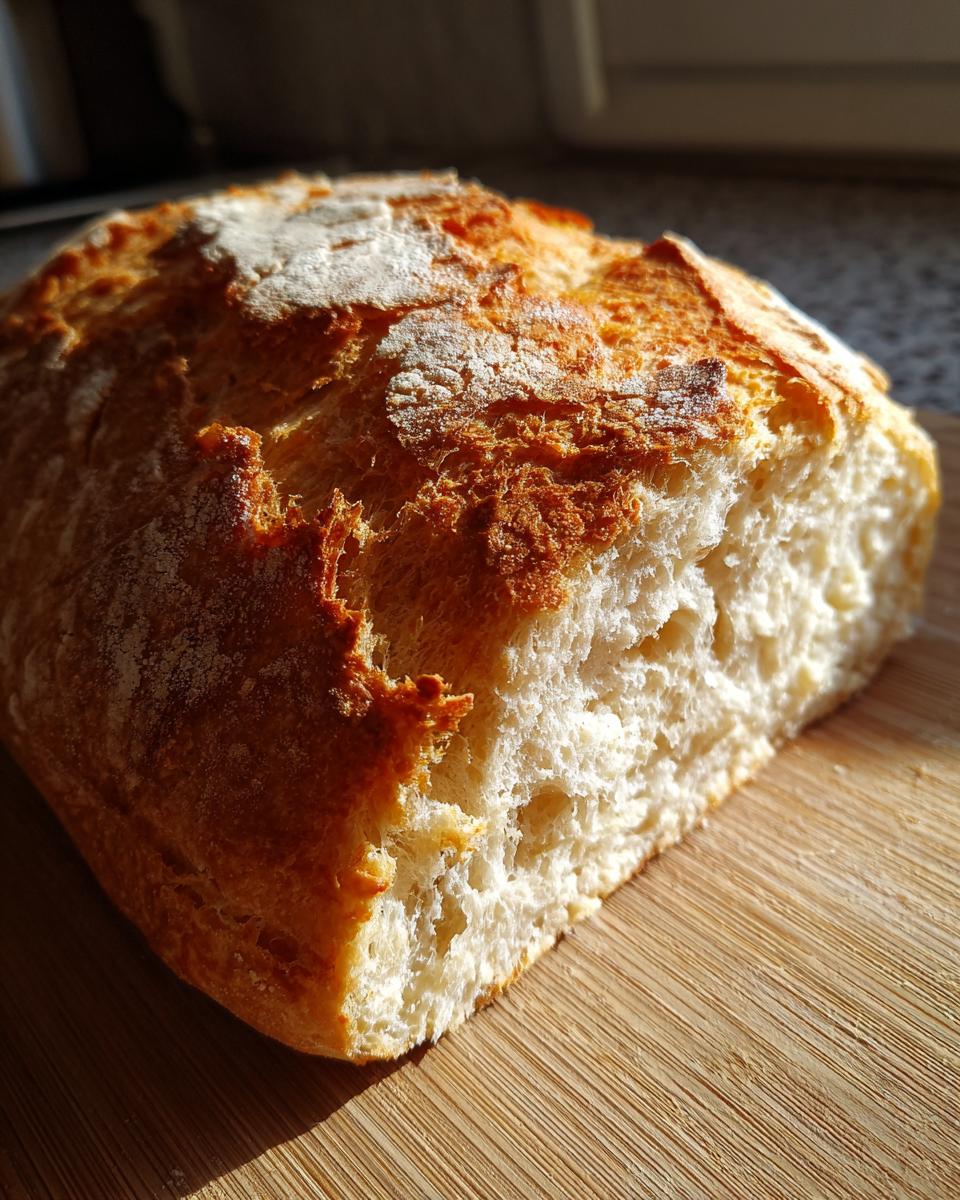
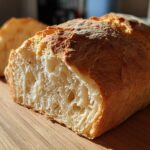
Once the oven is hot, it’s time to bake! Place the loaf in the oven and bake for 30-40 minutes, or until it’s golden brown and sounds hollow when you tap the top. To check for doneness, you can also use an instant-read thermometer. The internal temperature should be around 200°F (93°C). Careful, it’s hot! Once it’s done, let it cool on a wire rack before slicing and enjoying. The hardest part is waiting for it to cool down enough to eat, but trust me, it’s worth it!
Why You’ll Love This *Easy Homemade Bread Recipe*
Okay, so why should you, my friend, make this *easy homemade bread*? Let me tell you all the reasons! I’m practically drooling just thinking about it.
- It’s seriously easy! No fancy equipment needed, and the steps are super straightforward. Even if you’re a total beginner, you can totally do this!
- The taste is AMAZING! Forget those sad, store-bought loaves. This bread is soft, fluffy, and has the most incredible flavor. It’s like a warm hug in every bite.
- It’s cheaper than buying bread! Seriously! Flour, yeast, salt, water, and a little olive oil? It’s way less expensive than constantly buying loaves from the store.
- You know exactly what’s in it! No weird preservatives or chemicals. Just simple, wholesome ingredients. It’s a win-win for your health and your taste buds.
- The smell! Oh, the smell! Your kitchen will smell like a bakery heaven while it’s baking, making your house super cozy and inviting.
- It’s a great stress reliever. Kneading dough is surprisingly therapeutic. You’ll work out your frustrations and end up with something delicious to show for it.
- It’s totally customizable! Add herbs, seeds, or even a little cheese for extra flavor. You can make it your own!
Honestly, what’s not to love? This *easy homemade bread* recipe is a winner in every way!
Tips for Perfecting Your *Easy Homemade Bread for Beginners*
Alright, so you’ve made your *easy homemade bread* once – congrats! But, like anything, there’s always room for improvement, right? Here are some pro tips to help you get that perfect loaf, every single time. Trust me, these are things I’ve learned from countless loaves (and a few mistakes!)
Water Temperature is Key: I mentioned this before, but it’s worth repeating! The water temperature is *crucial* for activating the yeast. Too cold, and the yeast won’t wake up. Too hot, and you’ll kill it. The sweet spot is around 105-115°F (40-46°C). I always use a thermometer to be sure, especially when I’m feeling rushed. But if you don’t have one, just use your finger. It should feel comfortably warm. If it’s too hot to hold your finger in it for a few seconds, it’s too hot for the yeast!
Kneading Technique Know-How: Kneading might seem intimidating, but it’s really not! The goal is to develop the gluten in the flour, which gives the bread its structure. Don’t be afraid to get a little aggressive! Push the dough away from you with the heel of your hand, fold it over, and give it a quarter turn. Repeat, repeat, repeat! If the dough is too sticky, add flour a tablespoon at a time. If it’s too dry, add a tiny bit of water. You’ll know it’s ready when it’s smooth, elastic, and slightly tacky. It’s like a workout for your bread!
Recognizing the Perfect Bake: Knowing when your bread is perfectly baked is a bit of an art. Look for a golden-brown crust. Tap the top – it should sound hollow. You can also use an instant-read thermometer. The internal temperature should be around 200°F (93°C). But here’s my secret tip: when in doubt, bake it a little longer! A slightly over-baked loaf is always better than an under-baked one – nobody wants a gummy center!
Don’t Rush the Rise: I know, I know, we’re all busy. But letting the dough rise properly is essential for that perfect texture and flavor. Resist the urge to speed things up by putting it in a hot place. A slightly cooler, longer rise often results in even better flavor. Patience, my friends, patience! It’s worth it, I promise!
My Personal Tip: Don’t be afraid to experiment! Once you’ve mastered the basics of this *easy homemade bread for beginners* recipe, start playing around with different flours, herbs, and seeds. You might just discover your new favorite bread!
Serving Suggestions for Your *Easy Homemade Bread*
Okay, you’ve baked your gorgeous loaf of *easy homemade bread* – now what? Well, the possibilities are endless! This bread is so versatile, and it’s delicious with just about anything. Here are some of my favorite ways to enjoy it:
Simple & Classic: Sometimes, the best things are the simplest. A thick slice of warm bread, slathered with butter, is pure heaven. Add a sprinkle of sea salt if you’re feeling fancy! Or, try it with a drizzle of olive oil and a sprinkle of balsamic vinegar. Wow!
Spread the Love: This bread is the perfect canvas for all sorts of spreads! Try it with:
- Cream cheese (plain or flavored)
- Jam or jelly (raspberry, strawberry, apricot – yum!)
- Honey or maple syrup (for a sweet treat)
- Avocado (mashed with a little salt and pepper)
- Hummus (for a savory option)
- Homemade pesto (if you’re feeling ambitious!)
Pairing Perfection: This bread is an amazing sidekick for so many meals! It’s perfect alongside:
- Soup (tomato soup, French onion soup, any soup!)
- Salads (especially big, hearty salads)
- Pasta dishes (so you can soak up all that delicious sauce!)
- Grilled meats or veggies (it’s great for sopping up the juices!)
Get Creative: Don’t just stop at slices! There are tons of ways to use this bread in other recipes:
- Make French toast (the best French toast ever!)
- Turn it into croutons (homemade croutons are way better than store-bought!)
- Use it for bread pudding (a classic comfort food)
- Make grilled cheese sandwiches (because, why not?)
- Use it to make stuffing (for your Thanksgiving feast!)
Honestly, the only limit is your imagination! Get creative, and have fun. Enjoy your *easy homemade bread*!
Frequently Asked Questions About *Easy Homemade Bread for Beginners*
So, you’ve got questions? Awesome! I get it. Baking easy homemade bread can seem a little intimidating, but trust me, it’s totally worth it. Here are some of the most common questions I get about this recipe. Hopefully, these answers will help you feel confident and ready to bake!
Can I make this bread without a stand mixer?
Absolutely! You totally don’t need a fancy stand mixer to make this easy homemade bread for beginners. In fact, I usually knead the dough by hand. It’s a great workout! Just follow the instructions for kneading by hand, and you’ll be golden. A wooden spoon will work great for stirring the ingredients together too.
How do I store this bread?
Once your *easy homemade bread* has cooled completely, store it properly to keep it fresh. The best way is to wrap it tightly in a clean kitchen towel or a paper bag. You can also use a bread box if you have one. Avoid storing it in the refrigerator, as that can dry it out. It’ll stay fresh for about 3-4 days at room temperature. If you want it to last longer, you can freeze it! Just wrap the loaf tightly in plastic wrap, then place it in a freezer bag. It’ll keep for a couple of months.
Can I add other ingredients to the dough?
Oh, yes! This *easy homemade bread* recipe is super versatile. Feel free to get creative! You can add all sorts of things to the dough to customize the flavor. Some of my favorites are:
- Herbs: Rosemary, thyme, or oregano are all delicious. Add about 1-2 tablespoons of chopped fresh herbs to the dough after you’ve kneaded it.
- Seeds: Sesame seeds, poppy seeds, or sunflower seeds add a nice texture and flavor. Add about 1/4 cup of seeds to the dough.
- Cheese: Shredded cheese, like cheddar or Parmesan, is amazing! Add about 1/2 cup of cheese to the dough.
- Dried fruit: Raisins, cranberries, or apricots add a touch of sweetness. Add about 1/2 cup of dried fruit.
Just be sure to incorporate any additions evenly into the dough when you add them. Have fun playing around with it!
Why is my bread dense?
If your bread is coming out dense, there are a few things that could be the culprit. First, make sure your yeast is fresh! Expired yeast won’t make your bread rise properly. Also, make sure you’re kneading the dough long enough. Kneading develops the gluten, which gives the bread its structure. Finally, don’t over-proof the dough. If you let it rise for too long, it can collapse in the oven. Follow the instructions carefully, and you should be good to go!
Can I double or triple this recipe?
Absolutely! You can totally scale this easy homemade bread recipe up or down. Just make sure you adjust the baking time accordingly. If you’re making a larger loaf, it might need a little longer in the oven. Keep an eye on it, and use a thermometer to check the internal temperature. Happy baking!
Storage and Reheating Instructions for *Homemade Bread*
Okay, so you’ve baked your gorgeous loaf of *easy homemade bread*, and now you want to make sure it stays as delicious as possible, right? No problem! Here’s how to keep that bread fresh and how to bring it back to life if it’s been sitting around for a bit.
Storing Your *Homemade Bread*:
The best way to store your *homemade bread* is to let it cool completely on a wire rack first. Then, here’s what I do:
- Room Temperature: The best place to store your bread is at room temperature. Wrap it tightly in a clean kitchen towel or a paper bag. This helps it retain moisture and prevents it from drying out. A bread box is perfect if you have one!
- Avoid the Fridge: Please, please, *please* avoid storing your bread in the refrigerator! The fridge dries out bread super quickly, making it stale and sad.
- How Long Will It Last?: Stored properly, your *easy homemade bread* should stay fresh for about 3-4 days. After that, it might start to get a little stale, but don’t worry! It’s still great for toast or croutons!
- Freezing: If you’re not going to eat the whole loaf within a few days, freezing is your best bet! Wrap the entire loaf tightly in plastic wrap, then place it in a freezer bag. Make sure to squeeze out as much air as possible. It’ll keep for a couple of months.
Reheating Your *Homemade Bread*:
So, your bread’s a little past its prime? No problem! Here’s how to bring it back to life:
- Oven: Preheat your oven to 350°F (175°C). Wrap the loaf in foil, and bake it for about 10-15 minutes, or until it’s warmed through. The foil helps trap the moisture and keeps it from drying out.
- Toaster Oven: A toaster oven works great, too! Wrap your slice in foil and toast it until warm.
- Microwave (in a pinch): If you’re really in a hurry, you can microwave a slice for about 10-15 seconds. But be careful! The microwave can sometimes make bread a little tough.
- Toaster: Toasting is always a good idea! It’s the perfect way to revive a slightly stale slice.
And there you have it! Follow these simple tips, and you’ll be enjoying that *easy homemade bread* for days to come. Happy eating!
Estimated Nutritional Information for *Easy Homemade Bread for Beginners*
Okay, so you’re probably wondering about the nitty-gritty, right? I get it! Knowing what’s in your food is important. Now, keep in mind that nutritional information can vary a bit depending on the brands of ingredients you use and how you measure things. This is just an estimate, but it’ll give you a general idea of what you’re getting with each slice of this easy homemade bread.
Here’s what you can generally expect per slice (based on the recipe and a standard serving size):
- Calories: Around 120 calories
- Total Fat: About 2g (with a small amount of saturated fat, maybe around 0.5g)
- Protein: Roughly 4g
- Carbohydrates: Around 22g
- Fiber: About 1g
- Sugar: Around 2g
- Sodium: About 180mg
- Unsaturated Fat: Around 1.5g
- Trans Fat: 0g
- Cholesterol: 0mg
Keep in mind that if you add any extras – like seeds, herbs, or a delicious spread – those numbers will change! But hey, making your own bread is already a healthier choice than buying a loaf from the store. So go ahead, enjoy that warm, crusty slice! You deserve it!
For more delicious recipes and baking inspiration, check out my Pinterest page!
Print9 Reasons Why You’ll Love Easy Homemade Bread
Simple recipe for making delicious homemade bread.
- Prep Time: 20 minutes
- Cook Time: 35 minutes
- Total Time: 1 hour and 55 minutes
- Yield: 1 loaf 1x
- Category: Baking
- Method: Baking
- Cuisine: American
- Diet: Vegetarian
Ingredients
- 3 cups all-purpose flour
- 1 teaspoon salt
- 1 packet active dry yeast
- 1 1/2 cups warm water
- 1 tablespoon olive oil
Instructions
- In a large bowl, mix flour and salt.
- Add yeast and warm water.
- Stir until a dough forms.
- Knead for 5-7 minutes.
- Add olive oil and knead briefly.
- Place dough in a greased bowl.
- Let rise for 1 hour.
- Shape dough and bake at 375°F (190°C) for 30-40 minutes.
Notes
- You can add herbs or seeds.
- Bake until golden brown.
Nutrition
- Serving Size: 1 slice
- Calories: 120
- Sugar: 2g
- Sodium: 180mg
- Fat: 2g
- Saturated Fat: 0.5g
- Unsaturated Fat: 1.5g
- Trans Fat: 0g
- Carbohydrates: 22g
- Fiber: 1g
- Protein: 4g
- Cholesterol: 0mg