Amazing Easter Bunny Pancakes: 1 Recipe to Love
Okay, so, you *know* how much I love Easter, right? The egg hunts, the candy… but the absolute BEST part? The breakfasts! And this year, I’m sharing my secret weapon: the most adorable Easter bunny pancakes you’ve ever seen! Seriously, they’re like a little burst of spring on your plate. I’ve been making them for my kids for ages, and now they’re a total tradition. It’s the perfect way to get the little ones (and the big ones!) excited for the Easter festivities. Trust me, these aren’t just pancakes; they’re a whole experience. They’re super easy to make, and the kids absolutely adore helping with the decorating. Families, get ready to hop into a delicious morning!
Ingredients for Delicious *Easter Bunny Pancakes*
Alright, let’s get down to the good stuff—the ingredients! Don’t worry, it’s all pretty basic stuff, nothing too fancy. You probably already have most of it in your pantry, which is always a win, right? Here’s what you’ll need to make these adorable Easter bunny pancakes.
Dry Ingredients
First up, the dry stuff! It’s all about getting that perfect pancake texture.
Flour, Sugar, Baking Powder, and Salt
- 1 cup all-purpose flour (yep, the regular kind!)
- 2 tablespoons sugar (granulated is perfect)
- 2 teaspoons baking powder (this is what makes ’em fluffy!)
- 1/2 teaspoon salt (just a pinch to balance the sweetness)
Wet Ingredients
Now for the liquids! These are key for a moist and delicious pancake.
Milk, Egg, and Butter
- 1 cup milk (any kind works, but I usually use whole milk)
- 1 large egg (helps bind everything together)
- 2 tablespoons melted butter (makes them extra rich and yummy!)
Toppings and Decorations
And finally, the fun part! This is where those Easter bunny pancakes really come to life!
Chocolate Chips, Whipped Cream, and Fruit
- Chocolate chips (for the eyes!)
- Whipped cream (for the fluffy bunny tail – optional, but totally recommended!)
- Strawberries or other fruit for decoration (optional, but adds a pop of color and flavor!)
Step-by-Step Instructions to Make *Easter Bunny Pancakes*
Okay, friends, let’s get cookin’! Don’t worry, it’s way easier than it looks. I promise, even if you’re not a pro baker, you can totally nail these Easter bunny pancakes. The key is just taking it step by step. You got this!
Preparing the Pancake Batter
First things first: let’s get that batter ready. In one bowl, I like to whisk together all those dry ingredients. Just give it a quick mix to make sure everything’s evenly distributed. In a separate bowl, whisk together your wet ingredients – the milk, egg, and melted butter. Then, *gently* pour the wet stuff into the dry stuff. Now, here’s the most important part: don’t overmix! You want to stir just until everything is combined. A few lumps are totally fine! Overmixing makes for tough pancakes, and we want fluffy, right?
Cooking the *Easter Bunny Pancakes*
Next up, cooking time! Heat up your griddle or frying pan over medium heat. You’ll know it’s ready when a few drops of water sizzle and dance on the surface. Now, here’s where the bunny magic happens! Use a spoon or a measuring cup to pour the batter onto the hot griddle in a bunny shape. Make a round body, and then use the spoon to create the ears. I usually make two little ovals for the ears. Careful, it splatters! Cook for about 2-3 minutes per side, or until golden brown and cooked through. Keep an eye on them! You don’t want burnt bunny pancakes!

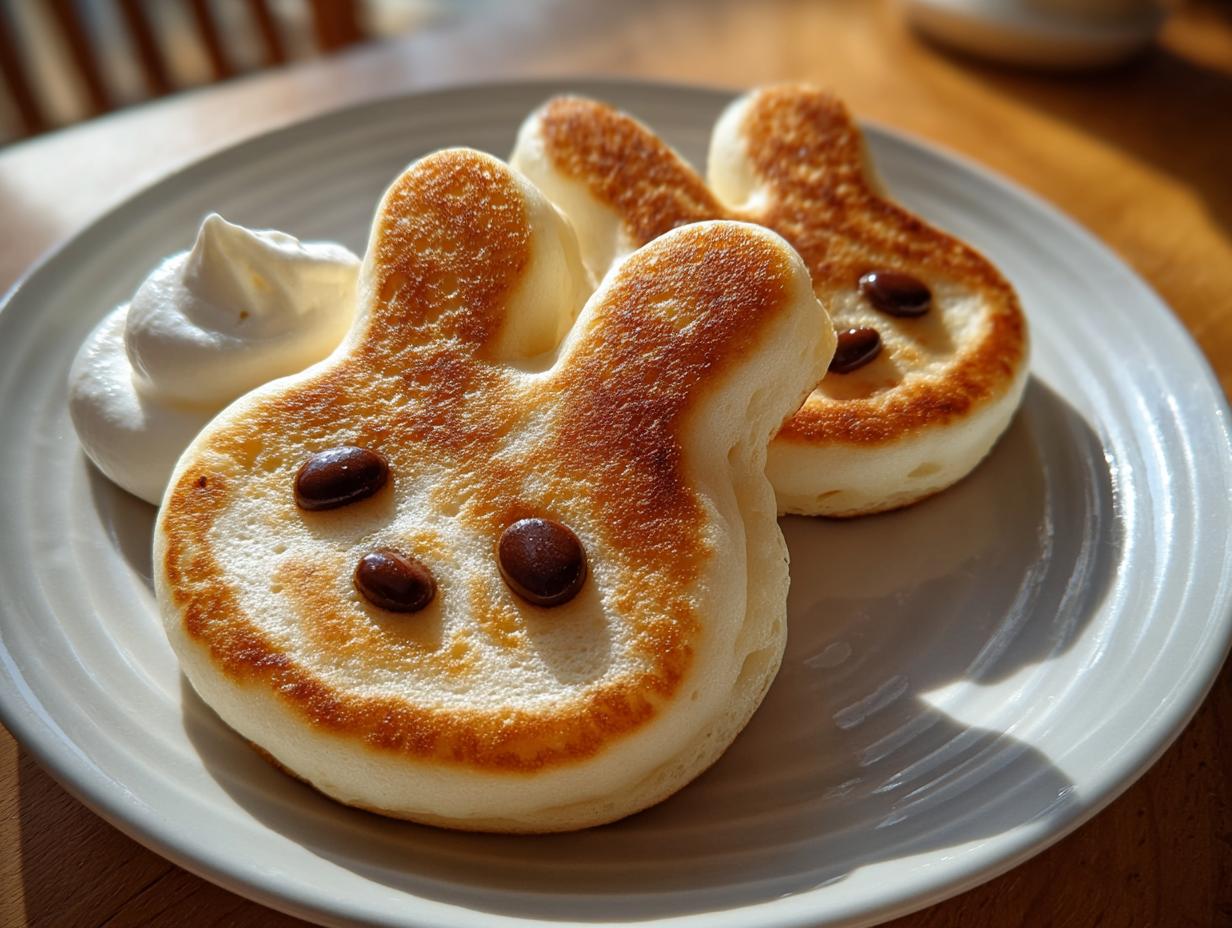
Decorating Your *Easter Bunny Pancakes*
And now, the fun part! Once your pancakes are cooked, it’s time to decorate! Stick two chocolate chips on for the eyes. Then, if you’re feeling extra, pipe on some whipped cream for a fluffy little tail. And if you’re feeling *really* fancy, add some strawberries or other fruit for a touch of color. You can get creative with it! That’s it! Serve immediately and watch the smiles appear!
Why You’ll Love These *Easter Bunny Pancakes*
Honestly, these Easter bunny pancakes are just pure joy, and here’s why you’re going to love them too!
Quick and Easy
Seriously, they’re ready in under 30 minutes. Perfect for those busy mornings!
Fun for Kids
My kids go WILD for these. It’s like a guaranteed happiness breakfast!
Festive for Easter
They’re the cutest way to celebrate Easter morning. Talk about a holiday hit!
Customizable
You can mix up the toppings, the fruit, the flavors… the possibilities are endless! Make it your own!
Ingredient Notes and Substitutions for *Easter Bunny Pancakes*
So, you might be wondering about some of the ingredients, right? Don’t worry, I’ve got you covered! I’ve played around with this recipe a bunch, and I’ve got some tips and tricks to make sure your Easter bunny pancakes turn out *perfect*.
Flour Options
I usually use all-purpose flour, but you can totally swap it out! Whole wheat flour adds a nice, nutty flavor. Or, if you’re gluten-free, a gluten-free all-purpose blend works great too! Just make sure it’s a 1:1 replacement.
Milk Alternatives
Don’t have regular milk? No sweat! Almond milk, soy milk, oat milk… they all work beautifully in this recipe. Just use the same amount as the recipe calls for, and you’re good to go. The taste might change slightly, but the pancakes will still be delicious!
Sweetener Substitutions
You can adjust the sweetness to your liking. If you want to use honey or maple syrup instead of sugar, you can! Just add it in with the milk and egg. Start with a tablespoon or two, taste the batter, and add more if you like it sweeter. Easy peasy!
Tips for *Easter Bunny Pancakes* Success
Want to make sure your Easter bunny pancakes are the *best* they can be? Here are a few pro tips I’ve learned over the years. Trust me, these small things make a big difference, so let’s get those pancakes perfect!
Griddle Temperature
The right temperature is key! You want a medium heat. If your griddle is too hot, the pancakes will burn before they cook through. Too cold, and they’ll be flat and sad. Keep an eye on it!
Batter Consistency
Don’t overmix! It’s so tempting, I know, but resist the urge! A few lumps are totally fine. The batter should be thick enough to hold its shape, but still pourable.
Flipping Technique
Patience, my friend! Wait until bubbles start to form on the surface and the edges look set. Then, gently slide your spatula underneath. A quick flip, and you’re golden!
Variations for Your *Easter Bunny Pancakes*
Okay, so you’ve mastered the basics, right? Now, let’s have some fun! These Easter bunny pancakes are super versatile, so you can totally mix things up. I love experimenting with different flavors and toppings; it keeps things exciting! Here are a few ideas to get you started.
Flavor Variations
Want to change up the flavor? No problem! Add a teaspoon of vanilla extract to the wet ingredients for a richer taste. Or, try a pinch of cinnamon or nutmeg for a cozy, spiced pancake. You could even add a tablespoon of cocoa powder for chocolate bunny pancakes!
Topping Ideas
The topping possibilities are endless! Think fresh berries, chocolate sauce, sprinkles, or even a dollop of lemon curd for a tangy twist. Don’t be afraid to get creative and see what you come up with. My favorite? A drizzle of maple syrup and a sprinkle of powdered sugar!
Serving Suggestions for *Easter Bunny Pancakes*
So, you’ve got your adorable Easter bunny pancakes, now what? I love serving them with a side of crispy bacon or sausage for a balanced breakfast! Fresh fruit and a big glass of orange juice are always a hit, too. Yum!
Storage and Reheating Instructions for *Easter Bunny Pancakes*
So, you made a big batch of Easter bunny pancakes, awesome! But what if you have leftovers? No worries! These are super easy to store and reheat. Just let them cool completely, then pop them in an airtight container or a zip-top bag in the fridge. They’ll keep for about 2-3 days.
To reheat, I usually just pop them in the toaster, on a low setting, or microwave them for a few seconds. You can also reheat them in a skillet over low heat. Easy peasy!
*Easter Bunny Pancakes* Recipe FAQs
Okay, so you’ve got questions? I get it! Here are some of the most common questions I get about these Easter bunny pancakes. Hopefully, this will clear up any confusion and help you become a bunny pancake pro in no time!
Can I use pancake mix instead of making the batter from scratch?
Absolutely! If you’re short on time, using a pancake mix is a total lifesaver. Just follow the instructions on the box and then pour the batter into your bunny shapes. Easy peasy! You might need to adjust the amount of liquid a bit, depending on the mix, so just keep an eye on the consistency. The most important thing is that you have those Easter bunny pancakes on your plate!
What if I don’t have a griddle?
No griddle? No problem! A regular frying pan works just fine. You might need to cook the pancakes in batches, but the results will be just as delicious. Just make sure your pan is non-stick, and you’ll be golden. The important thing is to make your Easter bunny pancakes a part of your Easter tradition!
How can I make these pancakes ahead of time?
Want to get a head start? I get that! You can mix the pancake batter the night before and store it in the fridge. Just give it a good stir before you start cooking, because the baking powder might settle a bit. You can also cook the pancakes ahead of time, let them cool completely, and then store them in the fridge. Reheat them in the toaster or microwave when you’re ready to serve. This is a game changer when you have a crowd and still want to serve up those delicious Easter bunny pancakes!
Can I freeze *Easter Bunny Pancakes*?
Yes, you can freeze them! Let the pancakes cool completely, then place them in a single layer on a baking sheet. Freeze them for an hour or two, until they’re solid. Then, transfer them to a zip-top bag or freezer-safe container. They’ll keep for about 2-3 months. To reheat, just pop them in the toaster, microwave, or oven. Easy to have Easter bunny pancakes any time of year!

Estimated Nutritional Information for *Easter Bunny Pancakes*
Alright, so I’m not a nutritionist, and this is just an estimate, but here’s a rough idea of the nutritional info per pancake. Remember, this will change depending on your toppings, but it’s a good starting point!
So, what are you waiting for? Hop to it! Give these Easter bunny pancakes a try, and let me know what you think! Rate the recipe, share your creations, and most importantly, have fun! Happy Easter, everyone! You can find more inspiration on my Pinterest page.
PrintAmazing Easter Bunny Pancakes: 1 Recipe to Love
Fluffy Easter bunny-shaped pancakes, perfect for a fun and festive breakfast.
- Prep Time: 10 minutes
- Cook Time: 15 minutes
- Total Time: 25 minutes
- Yield: 4 servings 1x
- Category: Breakfast
- Method: Griddle
- Cuisine: American
- Diet: Vegetarian
Ingredients
- 1 cup all-purpose flour
- 2 tablespoons sugar
- 2 teaspoons baking powder
- 1/2 teaspoon salt
- 1 cup milk
- 1 large egg
- 2 tablespoons melted butter
- Cooking spray
- Chocolate chips for eyes
- Whipped cream for tail (optional)
- Strawberries or other fruit for decoration (optional)
Instructions
- In a bowl, whisk together flour, sugar, baking powder, and salt.
- In a separate bowl, whisk milk, egg, and melted butter.
- Pour wet ingredients into dry ingredients and stir until just combined. Do not overmix.
- Heat a lightly oiled griddle or frying pan over medium heat.
- Pour batter onto the griddle in a bunny shape, using a spoon to create the ears.
- Cook for 2-3 minutes per side, or until golden brown.
- Use chocolate chips for eyes and whipped cream or fruit for the tail and decorations.
- Serve immediately.
Notes
- You can use different toppings like syrup, fruit, or chocolate sauce.
- Adjust the size of the pancakes to your preference.
- For a quicker breakfast, use a pancake mix.
Nutrition
- Serving Size: 1 pancake
- Calories: 200
- Sugar: 10g
- Sodium: 200mg
- Fat: 8g
- Saturated Fat: 4g
- Unsaturated Fat: 3g
- Trans Fat: 0g
- Carbohydrates: 28g
- Fiber: 1g
- Protein: 5g
- Cholesterol: 30mg